Monday 14 October 2013

get Context in non-Activity class (Android)

get Context in non-Activity class (Android)

To get the context in the non - activity class first 
we need the application class which extends Application
sample code:
public class Samp extends Application {

 private  static Context mContext;
 public static Context getContext() {
        return mContext;
    }

    public static void setContext(Context mContext1) {
        mContext = mContext1;
    }
   
}
In order to get the context in not Activity class create the instance in the non activity class as follows 
    private static Context context = samp.getContext();
samp.getContext(); // this will get the context for you any where ...


WHAT IS ANDROID? WHY IT IS CALLED SO...

Android robot.svg
MY NAME IS ANDROID 


1. Android is a mobile operating system
Android is the mobile operating system developed by Google. Essentially, Google produces the software that runs almost every other mobile phone besides Apple's iPhone. There are also some popular Android tablets as well. Android is a Linux-based software system, and similar to Linux, is free and open source software. This means that other companies can use the Android operating system developed by Google and use it in their mobile devices (more on that later). The distinguishing factor of this brand is a kernel. Android hosts a central core, which essentially is a strip code that helps the software operate.


PhoneGap Build - Set splash-screen for Android devices

To implement splash screen in android Phonegap its very simple and easy because
HTML5 made it easy for every developers to integrate animation and supportive
screen resolution with the help of html5 and css3 

Here in order to assign simple splash screen all you need is to

1. add a line of code in the java file
import android.os.Bundle;
import org.apache.cordova.*;

  public class Test extends DroidGap {
/** Called when the activity is first created. */
@Override
public void onCreate(Bundle savedInstanceState) {
    super.onCreate(savedInstanceState);
    super.setIntegerProperty("splashscreen", R.drawable.splash);
    super.loadUrl("file:///android_asset/www/index.html", 10000);
}
}
Here the splashscreen will be in drawable folder so the function
 setIntegerProperty() will set the splash screen
 
Bcas when ever the android application open it will call the main 
Activity the main activity 
extends Droidgap so the compiler understood that the application 
is webbased and start working
with the client library.
 
And for android you need to add config.xml in res folder 
 
and add the folowing code there 
 
<gap:splash src="img/splash/ios/test.png"  
width="320" height="480" />
<gap:splash src="img/splash/ios/test_at_2x.png"  
width="640" height="960" />
<gap:splash src="img/splash/ios/test_iphone5.png"  
width="640" height="1136" />
<gap:splash src="img/splash/ios/test-Landscape.png" 
 width="1024" height="768" />
<gap:splash src="img/splash/ios/test-Portrait.png" 
 width="768" height="1024" />
<gap:splash src="img/splash/ios/test-vc-Portrait.png" 
 width="1536" height="2008" />
<gap:splash src="img/splash/ios/test-test-Landscape.png"  
width="2048" height="1496" /> 
 
 
if you want to add the script add the following 
 
// Wait for Cordova to load
    //
    document.addEventListener("deviceready", onDeviceReady, false);

    // Cordova is ready
    //
    function onDeviceReady() {
        navigator.splashscreen.show();
} 
 
in the head session after the cordova load 

For android you will need different required sizes than iOS in some cases, 
which you can easily see again by looking at the defaults currently in place 
under the …/platforms/android/res folder within each of the drawable* 
folders as shown in the screenshot below (icon.png files need to be replaced with yours).
 The sizes of the splash screens for Android and how to implement them are
 also explained here in the PhoneGap docs. The splash screens need to be
 placed in the …/platforms/res/drawable folder
android-icons

Thursday 10 October 2013

PNR STATUS Mobile Application for PHONEGAP

PNR STATUS Android Application for PHONEGAP 
        In this tutorial you will learn about accessing the pnr status for ticket booking. this is the sample application where completed with the  dummy pnr number.
Android irctc application sample source code to check pnr status,Mobile application to retrieve the pnr info

Get PNR Status for a Ticket - JSON
Service Endpoint: http://www.railpnrapi.com/<PNR_NUMBER>
This api is the private api through which we can access the indian railway pnr status check service
Sample JSON Response Skeleton:
 {
 "ok": "1", 
"tnum": "12805", 
"tname": "JANMABHOOMI EXP", 
"tdate": "25-2-2013", 
"from": "GNT", "to": "SC",
 "class": "CC",
 "charted": true, 
"numofpax": 2,
 "pax": [ { "coach": "D2",
 "berth": "23", 
"quota": "GN", 
"status": "CNF" },
 { "coach": "S2",
 "berth": "43",
 "quota": "GN", 
"status": "CNF" } ] } 
To Work with Phone gap 
Prerequisites :
1.install phonegap icenium 
2.create a project and paste the following code in the index.html page and run the project
<!DOCTYPE html>
<!--
    Licensed to the Apache Software Foundation (ASF) under one
    or more contributor license agreements.  See the NOTICE file
    distributed with this work for additional information
    regarding copyright ownership.  The ASF licenses this file
    to you under the Apache License, Version 2.0 (the
    "License"); you may not use this file except in compliance
    with the License.  You may obtain a copy of the License at

    http://www.apache.org/licenses/LICENSE-2.0

    Unless required by applicable law or agreed to in writing,
    software distributed under the License is distributed on an
    "AS IS" BASIS, WITHOUT WARRANTIES OR CONDITIONS OF ANY
     KIND, either express or implied.  See the License for the
    specific language governing permissions and limitations
    under the License.
-->
<html>
    <head>
        <meta http-equiv="Content-Type" content="text/html; charset=UTF-8" />
        <meta name="format-detection" content="telephone=no" />
        <meta name="viewport" content="user-scalable=no, initial-scale=1, maximum-scale=1, minimum-scale=1, width=device-width, height=device-height, target-densitydpi=device-dpi" />
        <link rel="stylesheet" type="text/css" href="css/index.css" />
         <!-- JQUERY CSS -->
        <script src="http://code.jquery.com/jquery-1.8.3.min.js"></script>
        <link rel="stylesheet" href="http://code.jquery.com/mobile/1.3.0/jquery.mobile-1.3.0.min.css" />

        <!-- CORDOVA - PHONE GAP -->
        <script type="text/javascript" src="cordova.js"></script>
        <title>Hello World</title>
        <style>
            #container {
    margin: 10px;    
}
table, th, td {
    width:auto;
    border: 1px solid black;
    padding: 5px;
}
        </style>
        <script type="text/javascript">
            
        jQuery(document).ready(function() {
    var host = "http://www.railpnrapi.com/";
    console.log("Setting host to "+host);
    var sample_pnr = "6712133131";
            
    console.log("Setting Sample PNR to "+sample_pnr);
    var url_construct = host + sample_pnr;
    console.log("Full URL Construct is "+url_construct);
    var dataType = "json";
    console.log("Setting response DataType to "+dataType);
    console.log("Now making an AJAX GET request...");
    $.ajax({
        type: 'GET',
        url: url_construct,
        success: function(data) {
            console.log("Received JSON response: "+JSON.stringify(data));
            followthru(data);
        },
        dataType: dataType,
        cache: false
    });
    
    function followthru(rcvd_response) {
        if(rcvd_response.ok == "1") {
            console.log("Everything good...Proceed to process");
            process(rcvd_response);
        } else {
            console.log("Invalid PNR/Service Unavailable. Stop here!");
            alert("Invalid PNR/Service Unavailable");
        }
    }
    
    function process(info) {
        console.log("Started parsing JSON response");
        var traintr = jQuery("table tr#tr2:last");
        var paxpr = jQuery("table#paxinfo tr:last");
        var paxhtml = '';
        traintr.append("<td>"+info.tnum+"</td>");
        traintr.append("<td>"+info.tname+"</td>");
        traintr.append("<td>"+info.tdate+"</td>");
        traintr.append("<td>"+info.from+"</td>");
        traintr.append("<td>"+info.to+"</td>");
        traintr.append("<td>"+info.class+"</td>");
        traintr.append("<td>"+info.charted+"</td>");
        
        for(i=0;i<info.numofpax;i++) {
            paxhtml += '<tr>';
            paxhtml += '<td>';
            paxhtml += info.pax[i].coach;
            paxhtml += '</td>';
            paxhtml += '<td>';
            paxhtml += info.pax[i].berth;
            paxhtml += '</td>';
            paxhtml += '<td>';
            paxhtml += info.pax[i].quota;
            paxhtml += '</td>';
            paxhtml += '<td>';
            paxhtml += info.pax[i].status;
            paxhtml += '</td>';
            paxhtml += '</tr>';
        }
        paxpr.after(paxhtml);
        console.log("Response parsing done");
    }
});
        </script>
    </head>
    <body>
        <div data-role="page" id="container">
           <input type="text" id="pnrnumber" size="20" name="pnrnumber" value="" placeholder="pnr number" />
<table id="traininfo"><tr id="tr1">
    <th>Train #</th>
    <th>Train Name</th>
    <th>Train Date</th>
    <th>From</th>
    <th>To</th>
    <th>Class</th>
    <th>Chart Prepared</th>
</tr>
    <tr id="tr2"></tr>
</table>
<br />
<br />
<table id="paxinfo">
    <tr id="pr1">
        <th>Coach</th>
        <th>Berth</th>
        <th>Qouta</th>
        <th>Status</th>
    </tr>
</table>
</div>
    </body>
</html>
The pnr number is hard coded you can retrieve it from text box and have some function.
you can add css to design the table view in what model you want.
Key points:
Android, ios , bada, windows mobile application to check pnr status 

Disclaimer: This website is not affiliated with The Ministry of Railways, Government of India and does not store in its database any content of Indian Railways websites. For the official website, please visit Indian Railways 


Tuesday 8 October 2013

Android Example with source code Upload File To Server


Upload File To Server - Android Example 
this example uploading an image from sdcard to web server.

Steps :

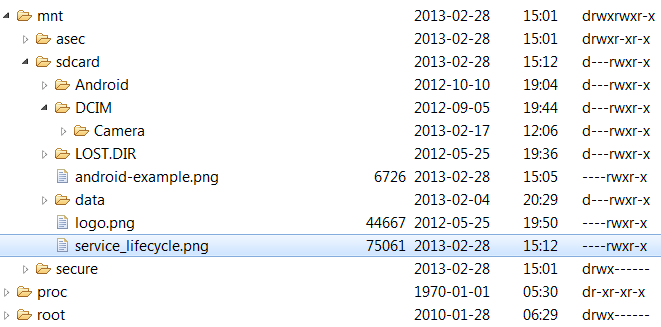
1. place an image on sdcard.

2. place sdcard image path and image name in UploadToServer.java. ( see below )

3. create a php script (UploadToServer.php) at server. ( see below )

4. place php script path in UploadToServer.java. ( see below )

5. create folder name uploads on server where you have placed php script.

6. give permission 777 (read/write/execute) to uploads folder.

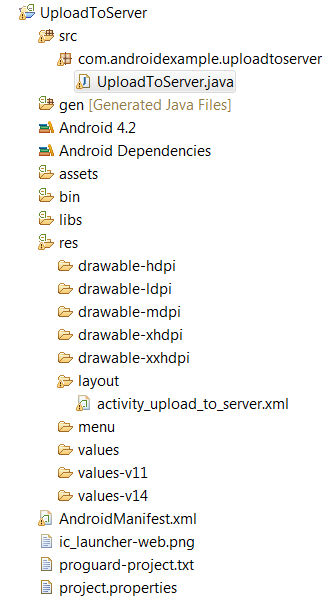
Project Structure : 


Upload Image Sdcard View :


File : AndroidManifest.xml 
<?xml version="1.0" encoding="utf-8"?>
<manifest xmlns:android="http://schemas.android.com/apk/res/android"
package="com.androidexample.uploadtoserver"
android:versionCode="1"
android:versionName="1.0" >
<uses-sdk
android:minSdkVersion="8"/>
<uses-permission android:name="android.permission.INTERNET"/>
<application
android:allowBackup="true"
android:icon="@drawable/ic_launcher"
android:label="@string/app_name"
android:theme="@style/AppTheme" >
<activity
android:name="com.androidexample.uploadtoserver.UploadToServer"
android:label="@string/app_name" >
<intent-filter>
<action android:name="android.intent.action.MAIN" />
<category android:name="android.intent.category.LAUNCHER" />
</intent-filter>
</activity>
</application>
</manifest>
File : res/layout/activity_upload_to_server.xml 

<?xml version="1.0" encoding="utf-8"?>
<LinearLayout xmlns:android="http://schemas.android.com/apk/res/android"
android:orientation="vertical"
android:layout_width="fill_parent"
android:layout_height="fill_parent"
>
<Button
android:layout_width="fill_parent"
android:layout_height="wrap_content"
android:text="Click To Upload File"
android:id="@+id/uploadButton"
/>

<TextView
android:layout_width="fill_parent"
android:layout_height="wrap_content"
android:text=""
android:id="@+id/messageText"
android:textColor="#000000"
android:textStyle="bold"
/>
</LinearLayout>
File : src/UploadToServer.java 
import java.io.DataOutputStream;
import java.io.File;
import java.io.FileInputStream;
import java.net.HttpURLConnection;
import java.net.MalformedURLException;
import java.net.URL;
import android.app.Activity;
import android.app.ProgressDialog;
import android.os.Bundle;
import android.util.Log;
import android.view.View;
import android.view.View.OnClickListener;
import android.widget.Button;
import android.widget.TextView;
import android.widget.Toast;

public class UploadToServer extends Activity {

TextView messageText;
Button uploadButton;
int serverResponseCode = 0;
ProgressDialog dialog = null;
String upLoadServerUri = null;


/********** File Path *************/
final String uploadFilePath = "/mnt/sdcard/";
final String uploadFileName = "service_lifecycle.png";
@Override
public void onCreate(Bundle savedInstanceState) {

super.onCreate(savedInstanceState);

setContentView(R.layout.activity_upload_to_server);

uploadButton = (Button)findViewById(R.id.uploadButton);

messageText = (TextView)findViewById(R.id.messageText);

messageText.setText("Uploading file path :- '/mnt/sdcard/"+uploadFileName+"'");

/************* Php script path ****************/

upLoadServerUri =
"http://www.welcome.com/media/UploadToServer.php";// replace with your server script url
uploadButton.setOnClickListener(new OnClickListener() {

@Override

public void onClick(View v) {

dialog = ProgressDialog.show(UploadToServer.this, "", "Uploading file...", true);

new Thread(new Runnable() {

public void run() {

runOnUiThread(new Runnable() {

public void run() {

messageText.setText("uploading started.....");

}

});
uploadFile(uploadFilePath + "" + uploadFileName);

}

}).start();

}

});

}

public int uploadFile(String sourceFileUri) {

String fileName = sourceFileUri;

HttpURLConnection conn = null;

DataOutputStream dos = null;

String lineEnd = "\r\n";

String twoHyphens = "--";

String boundary = "*****";

int bytesRead, bytesAvailable, bufferSize;

byte[] buffer;

int maxBufferSize = 1 * 1024 * 1024;

File sourceFile = new File(sourceFileUri);

if (!sourceFile.isFile()) {
dialog.dismiss();

Log.e("uploadFile", "Source File not exist :"

+uploadFilePath + "" + uploadFileName);

runOnUiThread(new Runnable() {

public void run() {

messageText.setText("Source File not exist :"

+uploadFilePath + "" + uploadFileName);
}

});

return 0;

}

else
{

try {

// open a URL connection to the Servlet

FileInputStream fileInputStream = new FileInputStream(sourceFile);

URL url = new URL(upLoadServerUri);

// Open a HTTP connection to the URL

conn = (HttpURLConnection) url.openConnection();
conn.setDoInput(true); // Allow Inputs
conn.setDoOutput(true); // Allow Outputs
conn.setUseCaches(false); // Don't use a Cached Copy
conn.setRequestMethod("POST");
conn.setRequestProperty("Connection", "Keep-Alive");
conn.setRequestProperty("ENCTYPE", "multipart/form-data");
conn.setRequestProperty("Content-Type", "multipart/form-data;boundary=" + boundary);
conn.setRequestProperty("uploaded_file", fileName);
dos = new DataOutputStream(conn.getOutputStream());
dos.writeBytes(twoHyphens + boundary + lineEnd);
dos.writeBytes("Content-Disposition: form-data; name="uploaded_file";filename=""
+ fileName + """ + lineEnd);
dos.writeBytes(lineEnd);
// create a buffer of maximum size
bytesAvailable = fileInputStream.available();
bufferSize = Math.min(bytesAvailable, maxBufferSize);

buffer = new byte[bufferSize];
// read file and write it into form...

bytesRead = fileInputStream.read(buffer, 0, bufferSize);

while (bytesRead > 0) {
dos.write(buffer, 0, bufferSize);

bytesAvailable = fileInputStream.available();

bufferSize = Math.min(bytesAvailable, maxBufferSize);

bytesRead = fileInputStream.read(buffer, 0, bufferSize);

}
// send multipart form data necesssary after file data...

dos.writeBytes(lineEnd);

dos.writeBytes(twoHyphens + boundary + twoHyphens + lineEnd);

// Responses from the server (code and message)

serverResponseCode = conn.getResponseCode();

String serverResponseMessage = conn.getResponseMessage();

Log.i("uploadFile", "HTTP Response is : "

+ serverResponseMessage + ": " + serverResponseCode);

if(serverResponseCode == 200){

runOnUiThread(new Runnable() {

public void run() {

String msg = "File Upload Completed.\n\n See uploaded file here : \n\n"

+" http://www.androidexample.com/media/uploads/"

+uploadFileName;

messageText.setText(msg);

Toast.makeText(UploadToServer.this, "File Upload Complete.",

Toast.LENGTH_SHORT).show();

}

});

}

//close the streams //

fileInputStream.close();

dos.flush();

dos.close();

} catch (MalformedURLException ex) {

dialog.dismiss();

ex.printStackTrace();

runOnUiThread(new Runnable() {

public void run() {

messageText.setText("MalformedURLException Exception : check script url.");

Toast.makeText(UploadToServer.this, "MalformedURLException",

Toast.LENGTH_SHORT).show();

}

});

Log.e("Upload file to server", "error: " + ex.getMessage(), ex);

} catch (Exception e) {

dialog.dismiss();

e.printStackTrace();

runOnUiThread(new Runnable() {

public void run() {

messageText.setText("Got Exception : see logcat ");

Toast.makeText(UploadToServer.this, "Got Exception : see logcat ",

Toast.LENGTH_SHORT).show();

}

});

Log.e("Upload file to server Exception", "Exception : "

+ e.getMessage(), e);

}

dialog.dismiss();

return serverResponseCode;

} // End else block

}

}

Php script at server :
This is the script to upload the data to the server.
File : UploadToServer.php
<?php

$file_path = "uploads/";
$file_path = $file_path . basename( $_FILES['uploaded_file']['name']);
if(move_uploaded_file($_FILES['uploaded_file']['tmp_name'], $file_path)) {
echo "success";
} else{
echo "fail";
}
?>