Wednesday, 25 September 2013

Single Sign On Facebook implementation

Single Sign On Facebook


Single Sign On (SSO) Using Android Native Client For Facebook :

This document will guide you through Facebook Platform integration for Android. The key steps to building a social Android app. This will include showing you how to enable Single Sign-On:

Step 1: Register your Android app with Facebook:
To begin integrating with the Facebook Platform, Click on this link: https://developers.facebook.com/apps create a new app on Facebook and enter your app's basic information.
Note your App ID. You are going to need it when integrating Facebook Android SDK into your code. You application is now set up and you’re ready to begin integrating with Facebook.

Step 2: Download Facebook Lib: 

From this link git://github.com/facebook/facebook-android-sdk.git download facebook library.

Step 3: Create Facebook SDK Project:

For the first time, you will need to create a new Android project for the Facebook SDK source which can be reference from your app.
This is only required once. Open Eclipse and create a new Android Project (File | New | Project | Android Project) for the Facebook Android SDK source and later reference it from your app.
Get the content by selecting Create project from existing source and specifying the facebook directory from your git repository (~/facebook-android-sdk/facebook).


Step 4: Add reference to the Facebook SDK:

Create a new Android project for your app or use your existing project and add a reference to the Facebook SDK project. You do this by opening the properties window for your app (File | Properties | Android), pressing the Add... button in the Library area and selecting the Facebook SDK project created above.


Step 5: Add your app's signature to the Facebook App Settings:
Facebook requires an additional layer of security for mobile apps in the form of an application signature.
You need to put your Android application signature into your Facebook app settings.

From the Java JDK keytool.  

The instructions in the build step will show you how to get the application signature that you should then register in the Mobile section of the Developer App.

Using the Keytool:

Generate the Native Android App - Android Key Hash by running this command:

C:\Program Files\Java\jdk1.7.0_04\bin>keytool -v -list -alias androiddebugkey –keystore "C:\Documents and Settings\IBM\.android\debug.keystore" -storepass android –keypass android 

You application is now set up and you’re ready to begin integrating with Facebook!
Note: Keytool password : android .
You can generate a signature by running the keytool that comes with the Java JDK. The following shows how to export the key for your app using the debug defaults specified by the Android SDK and Eclipse.

PLEASE READ - the keytool.exe silently generates a keyhash even if it can't find the debug.keystore or if the password is incorrect. Make sure that you have provided the correct path to the debug.keystore. For Windows, it is generally at C:\Users\<user>\.android\ and for Mac at /Users/<user>/.android/. Also make sure you are using the correct password - for the debug keystore, use 'android' to generate the keyhash. General Rule: If the tool does not ask for password, your keystore path is incorrect. More info under 'Signing in Debug Mode' on the Signing Your Applications ( http://developer.android.com/guide/publishing/app-signing.html ). Refer to Troubleshoot section below for more tips on keyhash.
keytool -exportcert -alias androiddebugkey -keystore ~/.android/debug.keystore | openssl sha1 -binary | openssl base64.This tool generates a string that must be registered in the Mobile section of the Developer App for your app. Remember to click 'Save Changes' to save the keyhash.


Step 6: Enable Single Sign-On for your App:
Single Sign-On allows user to authorize your app without typing their facebook username and password. This is accomplished by sharing intent with the Facebook app. If the user has already installed and authorized the facebook app, your app can leverage the Facebook app authentication via Single Sign On. It is highly recommended that you implement SSO for your app to enable frictionless authorization. Note that the SSO will fall back to webview based oauth dialg if the Facebook app is not installed on the handset.

Step 6.1: Modify the AndroidManifest.xml for the Network calls:
Once the Facebook SDK is referenced, the app manifest needs to be modified to allow the app to make network calls to Facebook. This is accomplished by adding the following to the AndroidManifest.xml file in the app project (Note that by default the Eclipse may open the Manifest tab. Click on the AndroidManifest.xml tab in the editor's bottom bar to open the editor view): <uses-permission android:name="android.permission.INTERNET"/>


Step 6.2: Single-Sign-On (SSO):

As with the iOS SDK, one of the most compelling features of the Android SDK is Single-Sign-On (SSO). SSO lets users sign into your app using their Facebook identity. If they are already signed into the Facebook Android app on their device they do not have to even type a username and password. Further, because they are signing to your app with their Facebook identity, you will have access to their profile information and social graph.

Adding SSO to your app is very simple with the Facebook SDK. The below example outlines what code must be written to enable this feature. For the sake of simplicity, SSO functionality will be added to the Activity that was created by Eclipse when the app project was created. Open the MyGreatApp project -> src -> com.greatapp -> MyGreatActivity.java. Replace the existing code by Copy-paste the code below while replacing the "YOUR_APP_ID" with the "APP_ID" of your app and save the file:

package com.Your_app_package_name;
import android.app.Activity;
import android.content.Intent;
import android.os.Bundle;
import com.facebook.android.*;
import com.facebook.android.Facebook.*;

public class MyGreatActivity extends Activity
 {
    Facebook facebook = new Facebook("YOUR_APP_ID");
   
@Override
    public void onCreate(Bundle savedInstanceState) {
        super.onCreate(savedInstanceState);
        setContentView(R.layout.main);
        facebook.authorize(this, new DialogListener() {
       
    @Override
            public void onComplete(Bundle values) {}
            @Override
            public void onFacebookError(FacebookError error) {}

            @Override
            public void onError(DialogError e) {}

            @Override
            public void onCancel() {}
        });
    }
    @Override
    public void onActivityResult(int requestCode, int resultCode, Intent data) {
        super.onActivityResult(requestCode, resultCode, data);

        facebook.authorizeCallback(requestCode, resultCode, data);
    }
}

Note: For more information visit this link 
    http://developers.facebook.com/docs/mobile/android/build/#sso

Source: internet.. Author Rahul Baradia blogger

Tuesday, 24 September 2013

how to implement PieChart in android sample source code

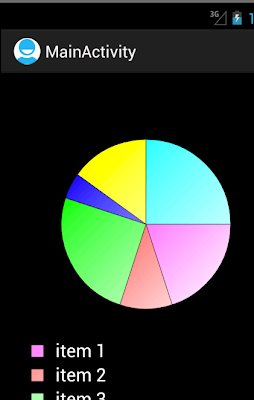
This demo demonstrates the usage of Android Graphics API to create simple 2D Pie chart and handling of touch event on the Pie-chart. This demo draws the 2D Pie chart based on the given data inputs, colors. Data legends are shown at the bottom of the chart as shown in the below image. Also, it handles the touch events and identifies the particular pie slice whether touched or not to support drilled down features.

Pie Chart using Android Graphics API

Let me explain the application in more details, the steps to draw the Pie-Chart.

1. Create a simple view layout containing one Image View. (activity_main.xml)

<RelativeLayout xmlns:android="http://schemas.android.com/apk/res/android"
    xmlns:tools="http://schemas.android.com/tools"
    android:layout_width="match_parent"
    android:layout_height="match_parent" >

<ImageView
    android:id="@+id/image_placeholder"
    android:layout_width="fill_parent"
    android:layout_height="fill_parent"
    android:adjustViewBounds="false"
    android:background="#000000"
    android:scaleType="center" />

</RelativeLayout>


2. Create a main activity which contains the above layout (MainActivity.java)


    public void onCreate(Bundle savedInstanceState) {
        super.onCreate(savedInstanceState);
       
        //main layout
        setContentView(R.layout.activity_main);
        
        //pie chart parameters
        int data_values[] = { 20,10,25,5,15,25};
        int color_values[] = {Color.MAGENTA, Color.RED, Color.GREEN,Color.BLUE,Color.YELLOW,Color.CYAN};
        String itemnames[] = { "item 1""item 2""item 3""item 4""item 5","item 6"};
        
        //get the imageview
        ImageView imgView = (ImageView ) findViewById(R.id.image_placeholder);
         
        //create pie chart Drawable and set it to ImageView
        PieChart pieChart = new PieChart(this, imgView, itemnames, data_values, color_values);
        imgView.setImageDrawable(pieChart);

    }


Create  the required pie-chart parameters like data values, names, colors and create PieChart drawable Shape instance and assign to Image View.

3. PieChart Drawable Shape


Create a PieChart Class by extending Drawable Class and  implementation for OnTouchLister.

public class PieChart extends Drawable implements OnTouchListener {....}

Add the constructor with the required parameters for to draw the Pie Chart.


     public PieChart(Context c, View v, String[] data_names, int[] data_values, int[] color_values) {
         context = c;
         view = v;
         this.data_values = data_values;
         this.color_values = color_values;
         this.data_names = data_names;
         
         paint = new Paint();
         view.setOnTouchListener(this);
     }


And Now, Overwrite the draw() method with the below steps

  • Get the screen width & height
  • Calculate the chart area in Rectangle area
  • Calculate the start angle and Sweep angle for each data item
  •  And finally Draw the Arc, legend box, legend text with corresponding paint.


public void draw(Canvas canvas) {
// TODO Auto-generated method stub

//screen width & height
int view_w = view.getWidth();
        int view_h = view.getHeight();
        
     //chart area rectangle
      arc_bounds = new RectF(
                 left_edge,
                 top_edge,
                 right_edge,
                 bottom_edge
         );

        //sum of data values
        for (int datum : data_values)
                value_sum += datum;
        
        float startAngle = 0;
        int i = 0;
  
        for (int datum : data_values) {
                if (datum == 0) continue;
                
                //calculate start & end angle for each data value
                float endAngle = value_sum == 0 ? 0 : 360 * datum / (floatvalue_sum;
                float newStartAngle = startAngle + endAngle;
                
             
                int flickr_pink = color_values[i % color_values.length];
                paint.setColor(flickr_pink);
                paint.setAntiAlias(true);
                paint.setStyle(Paint.Style.FILL);
                paint.setStrokeWidth(0.5f);
                
                //gradient fill color
                LinearGradient linearGradient = new LinearGradient(arc_bounds.leftarc_bounds.toparc_bounds.right,arc_bounds.bottom, flickr_pink, Color.WHITE, Shader.TileMode.CLAMP);
                paint.setShader(linearGradient);
                
                //draw fill arc
                canvas.drawArc(arc_bounds, startAngle, endAngle, truepaint);
            
                Paint linePaint = new Paint();
                linePaint.setAntiAlias(true);
                linePaint.setStyle(Paint.Style.STROKE);
                linePaint.setStrokeJoin(Join.ROUND);
                linePaint.setStrokeCap(Cap.ROUND);
                linePaint.setStrokeWidth(0.5f);
                linePaint.setColor(Color.BLACK);

                //draw border arc
                canvas.drawArc(arc_bounds, startAngle, endAngle, true, linePaint);
                
                int barStartX = 50;
                int barWidth = 20;
                int barStartY = view_h-padding_bottom+(i-1)*2*barWidth;
               
                Rect barRect = new Rect(barStartX,barStartY,barStartX+barWidth,barStartY+barWidth);
                
                //draw legend box
                canvas.drawRect(barRect, paint);
                canvas.drawRect(barRect,linePaint);
                
                
                Paint textPaint = new Paint();
                textPaint.setAntiAlias(true);
                textPaint.setColor(Color.WHITE);
                textPaint.setTextSize(30);
                
                //draw legend text
                canvas.drawText(data_names[i], barStartX+2*barWidth, barStartY+barWidth, textPaint);
                
                startAngle = newStartAngle;
                i++;
        }
}


4.. Adding Touch Listener

Now, Implement the onTouchListener with below steps,
  • Get mouse down event
  • Calculate the click angle
  • Check the condition with the start angle and Sweep angle for each data item


public boolean onTouch(View v, MotionEvent event) {
// TODO Auto-generated method stub
//mouse down event
if( event.getAction() == MotionEvent.ACTION_DOWN)
{

double clickAngle;
//relative x & y position
float xPos = event.getX() - arc_bounds.centerX();
float yPos = event.getY() - arc_bounds.centerY();
//calcuate the click angle
clickAngle = Math.atan2(yPos,xPos) * 180 / Math.PI;
if(clickAngle < 0)
clickAngle = 360 + clickAngle;
float startAngle = 0;
int itemIndex = 0;
for (int datum : data_values) {
if (datum == 0) continue;

float endAngle = value_sum == 0 ? 0 : 360 * datum / (floatvalue_sum;
float newStartAngle = startAngle + endAngle;
 
//check the condition of start angle & end angle of data item.
             if(arc_bounds.contains(event.getX(),event.getY())  && clickAngle > startAngle && clickAngle < newStartAngle)
             {
            
             Toast.makeText(contextdata_names[itemIndex] + "  is clicked!!", Toast.LENGTH_LONG).show();
             Log.d(TAG,"pie item is clicked-->" + data_names[itemIndex]);
             break;
             }
           
             itemIndex++;
startAngle = newStartAngle;

}
}

return false;
}


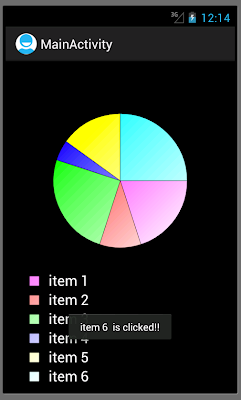
the below image shows the Toast message when the particular pie slice is touched. Based on this event, drilled down feature will be supported like starting activity or reloading the view with different data values.


PieChart with OnTouchLister Implementation


Conclusion:

The above sample demo application uses the Android Graphics API to draw simple 2D PieChart and supports the touch events. calculation used for detecting the Pie Slice is shown in the above sample. This sample will help to create interactive charts, decision like starting new activity, different view based on the pie slice selection.